
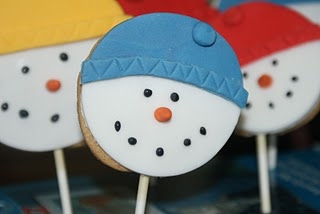
Day 2 of The Pink Whisk 12 Days of Christmas and this year, Father Christmas is being joined by some little helpers – Elf Cookie Lollies!
You will need:
1 x batch of Vanilla Sugar Cookie Dough recipe here rolled out to a depth of 4-5mm between 2 sheets of baking paper and chilled until firm.
Large heart cutter (4″ approx)
Lolly sticks
Sugarpaste; flesh, green, red
(Ready coloured, or coloured yourself with gel paste colours – Set of Wilton pastes, green paste, red paste)
Gold dragees (balls!)
(Equipment links to Amazon)
From the chilled cookie dough cut out shapes with the large heart cutter, using a sharp knife split them in half down the middle.

Round off the sharp edge with the knife

Cut out all the cookies you need, and they should be starting to soften off a little.
Gently insert a lolly stick into the cookie, through the bottom of the face.
With your fingers gently bend the tip of the hat to the left or the right, leaving some pointing straight upwards and set onto a baking tray lined with baking paper.

Bob the tray back in the fridge for 10 minutes to firm up again.
Preheat the oven to 170c (fan)/190c/ Gas Mark 5 and bake them in the oven for 8 minutes until they’re lightly golden brown around the edges.
Leave them to cool fully on the tray as they’ll be soft when they come out of the oven.
Once they’re fully cooled it’s on with the decorating!
When working with sugarpaste I work on a Non-stick mat which means there’s virtually no need to dust the surface with icing sugar – it does help to keep colours free from the dratted white dust! Of course you’re not all going to have one of those so will need a very light dusting of icing sugar to stop the pieces from sticking to your worktop.
Each of the pieces is glued in place with a tiny dab of water using a paintbrush – again, because I do a lot of this sort of stuff I use a Waterbrush which holds a small amount of water in the reservoir and you can just use it like you would a normal brush but without the need for dipping in a pot of water.
For the face cut out a circle of flesh coloured paste.

Brush the surface of the cookie with a little water and position the circle in place.

Lightly roll over it with a rolling pin to get the face to fill the cookie. It just eases it out to the right shape.


For the hat you’ll need some green, cut out a piece using the pointy part of the heart cutter.

Split in in half with a sharp knife. Now using a round cutter, cut away the base of his hat.

And then into position.

For the hat trim, cut out a large circle and cut away the centre using a smaller circle.

With the knife, cut into the loop and gently ease it out into a strip.

Using the pointed part of the heart cutter create the spikes of the hat trim.

Trim a piece to fit the Elf’s hat and using the wrong end of a paintbrush indent the tops of the spikes.

And fit it over where the face meets the hat.

Add a tiny dot of water to each indent and gently press in a gold dragee.
Using the wrong end of piping nozzle imprint a cheeky Elf smile.

Stick on a ball of flesh sugarpaste for his nose.

Bit of blusher! Give him a rosy cheeked glow with some pink lustre dust brushed on lightly with a paintbrush.

Two eyes with the black edible pen (the pen’s not edible of course, just the ink!)

A ball of red sugarpaste for the tip of his hat – if you grease your hands with a tiny bit of trex, or white vegetable fat, balls of sugarpaste will roll shiny and without a crack in sight.

Lastly are the Elfish ears. Two balls of flesh coloured paste, pinch one side of each ball to create the pointy shape and indent the centres with the wrong end of a paintbrush.

Stick them in place and Santa’s little helper is good to go – he just needs a full team!

These are off to the school Christmas Fair.

Have fun!
Ruth x
If you like these, then you’ll love these projects too! (click on the links to take you directly to them)
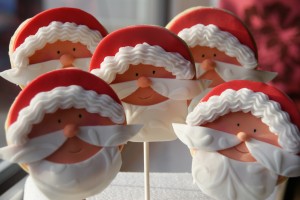
Father Christmas Cookie Lollies


Ruth Clemens, Baker Extraordinaire


Pingback: 12 Days of Christmas 2012 | Baking, Recipes and Tutorials - The Pink Whisk