I know a fair few of you wanted me to blog how to make the blush roses I used on my traditional cake in The Great British Wedding cake, so here it it….. how to make sugar roses.
You will need:
White Sugar Florist Paste (SFP)
White fat such as Trex
Small rolling pin
Rose petal cutters or a small round cutter
Ball tool
Foam pad
Water and paintbrush
Empty egg box
Sugarflair blossom tint powder – Rose
Large powder brush
Here are some handy product links:
Sugar Florist Paste (SFP) is the key to really great sugar roses. It is extra strong when dry, dries out quickly and can be rolled out super thinly without breaking. You can of course make roses from regular sugarpaste but they will have to be much thicker and because it takes an age to dry out it is difficult to keep the rose petals in shape.
When working with SFP I like to work on a glass worktop protector as the surface is glass it is super smooth, and I can sit at the table to work too instead of hunched over the worktop in the kitchen! It’s entirely optional but you can pick them up fairly cheaply from most of the larger supermarkets – just make sure it’s smooth and not a bobbly one!
Instead of using icing sugar I always use Trex with SFP, it helps it stay moist whilst you’re working with it and makes it shiny too.
Grease the board with a little smear of trex, apply a little to your hands too.
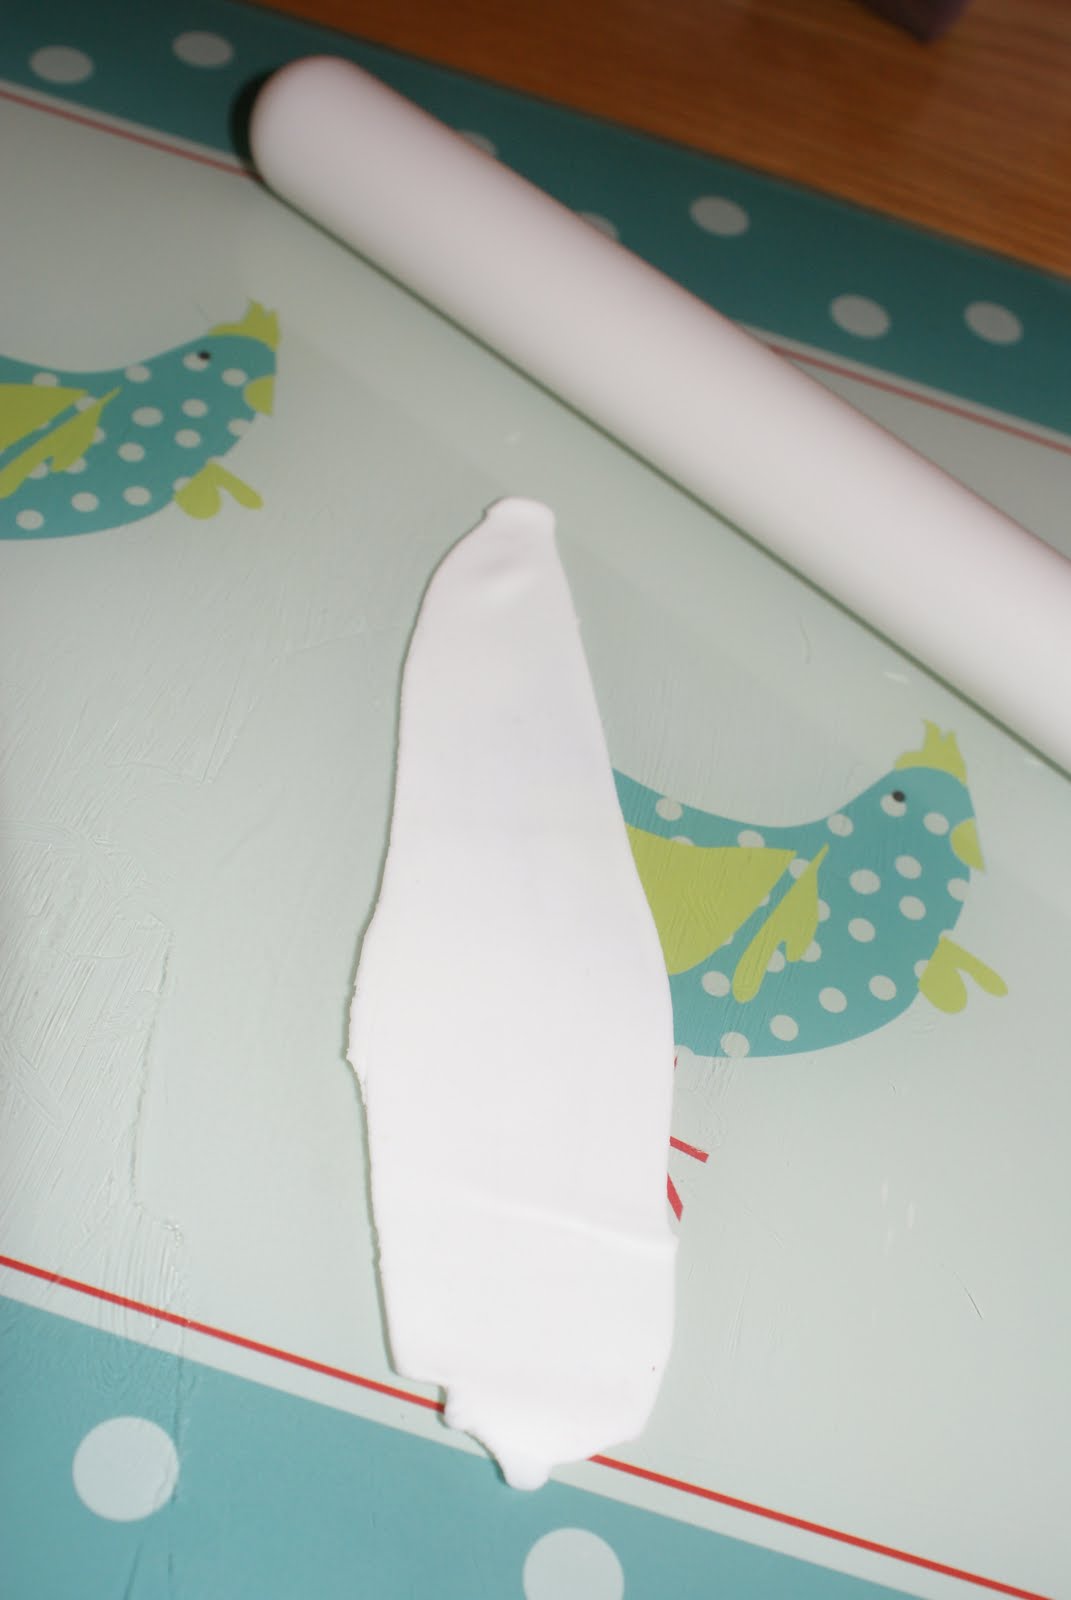
Take a small amount of SFP and knead it in your hand until it’s smooth and ready to work with.
Make a small ball and then taper one side to make a cone. This will form the base of the rose.
Roll out a small amount of SFP on your board, nice and thinly 1-2mm.
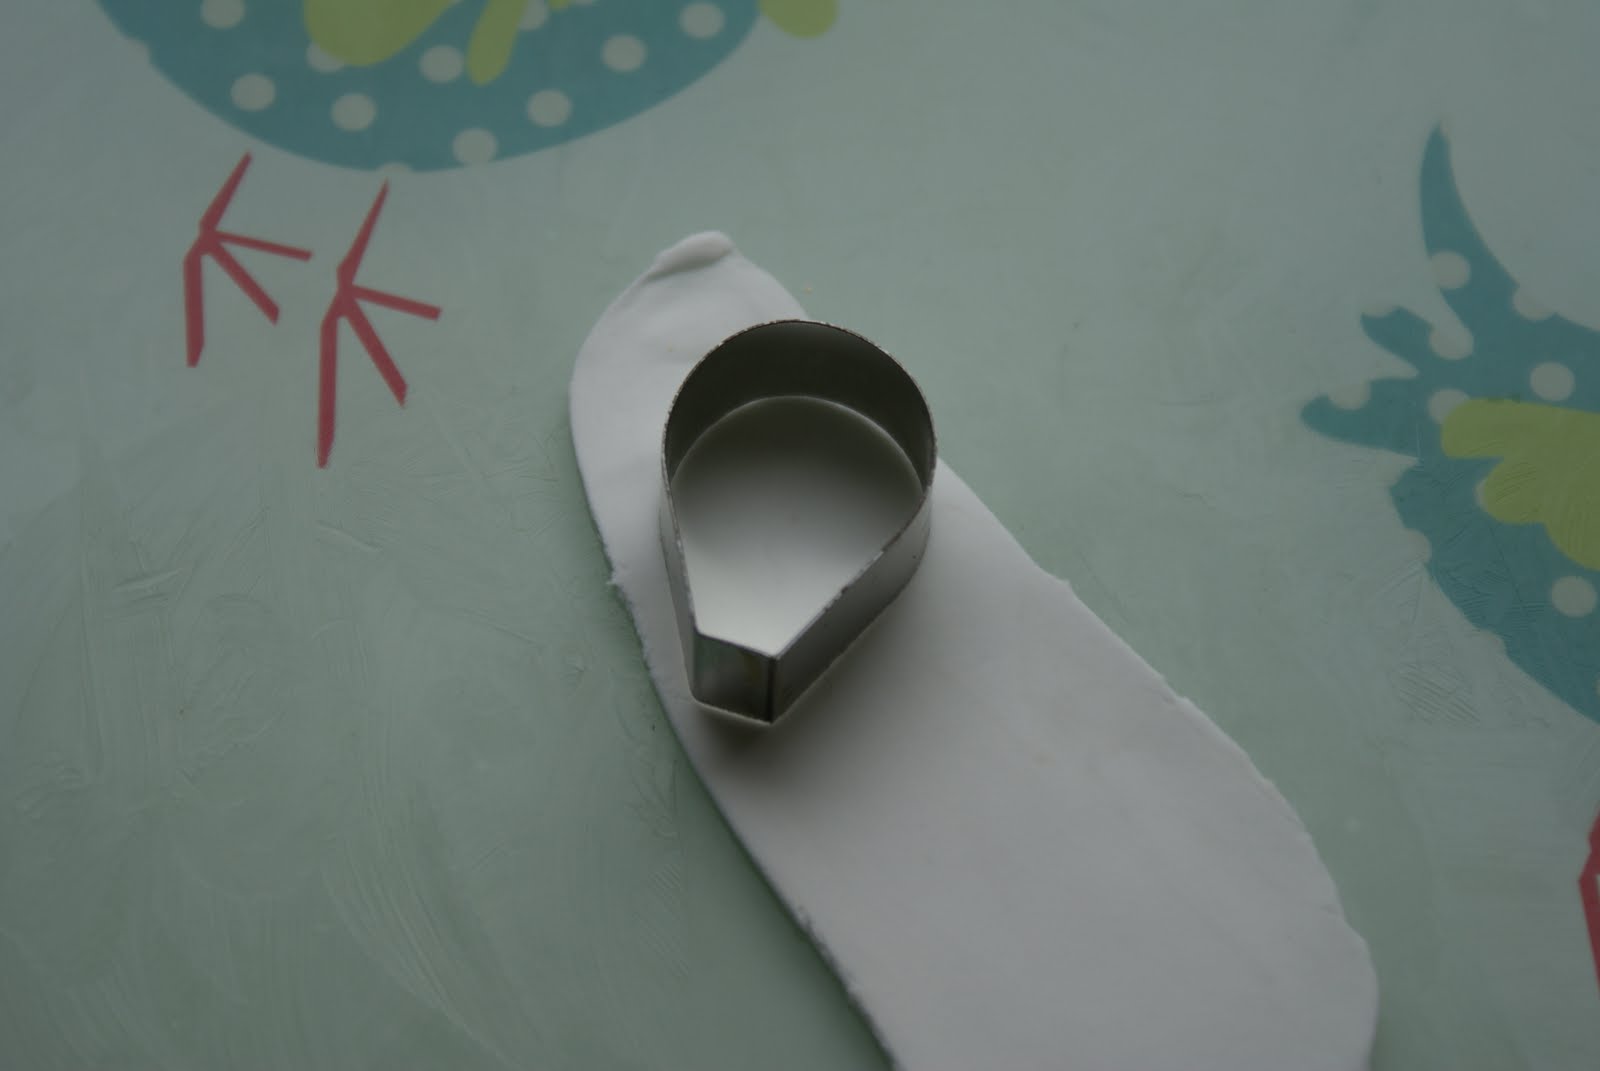
Working with just one petal at a time, cut out one petal using your cutter. If you’re investing it is best to buy a set of graduated sizes. The larger the petal cutter the larger the rose.
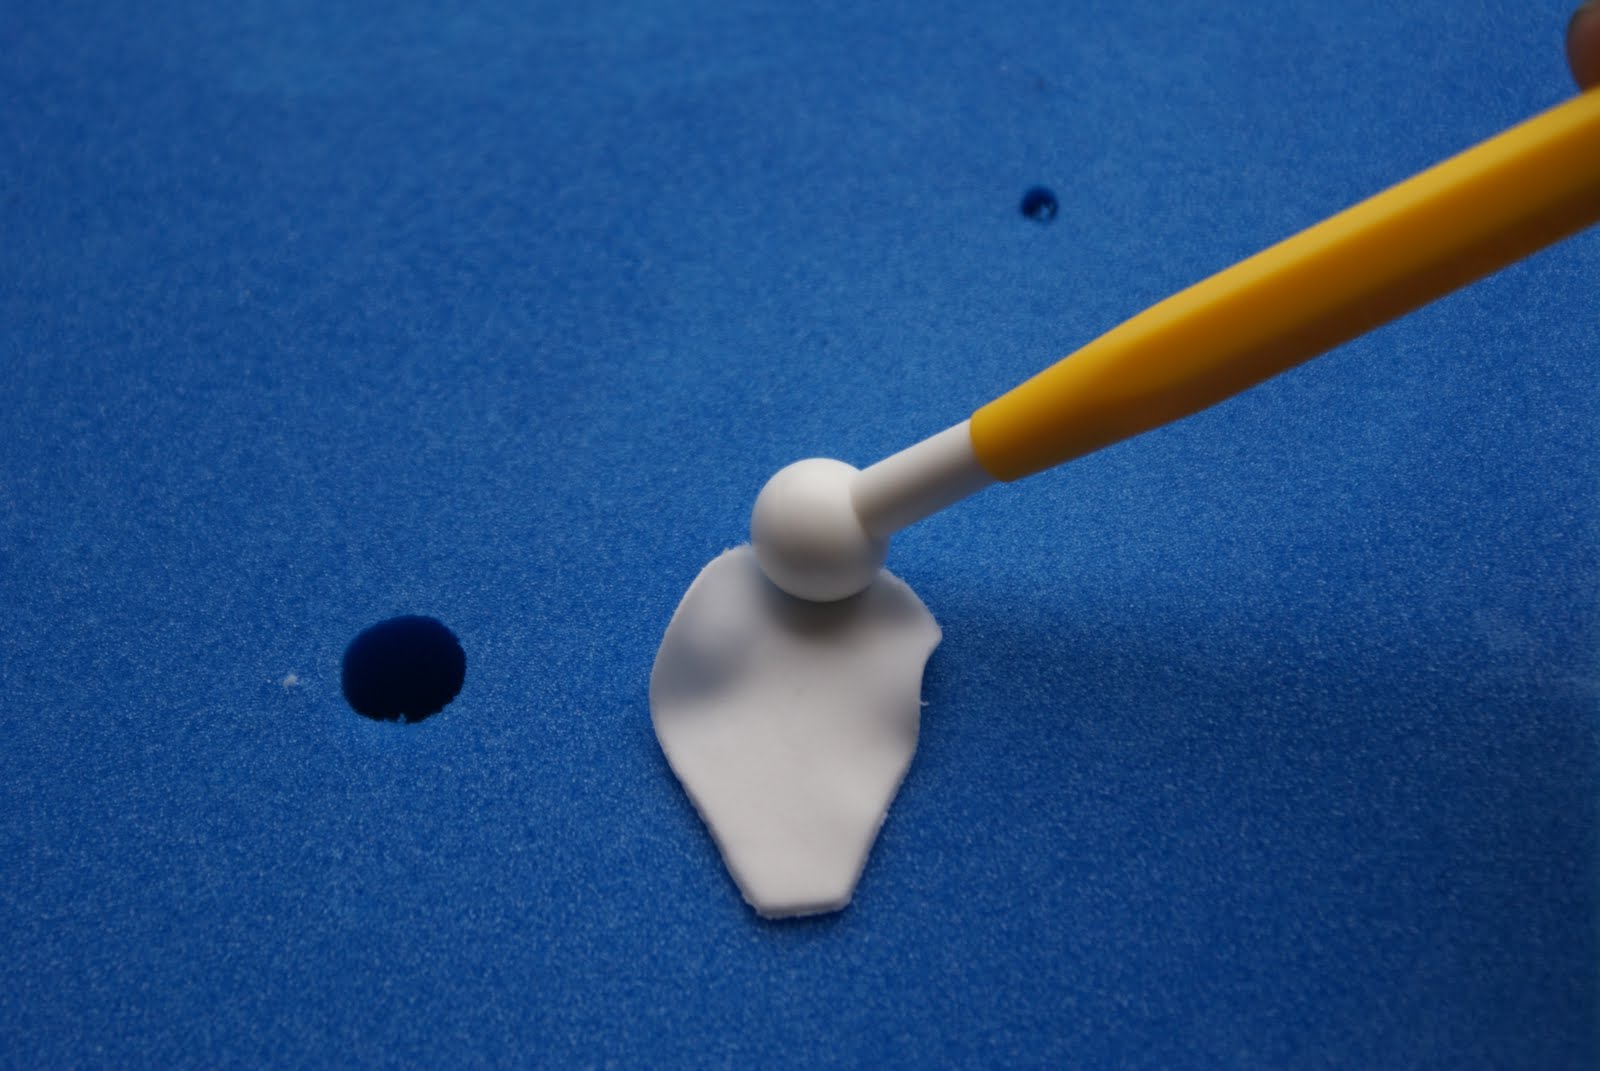
Transfer the petal to your foam pad. Take the large end of the ball tool and rub it over the very top edge of the petal. This thins the edge of the petal and creates a look of the natural movement in rose petals.
Add a dab of water with the paintbrush to the back of the petal. Position the cone on top of the petal and draw the edges together to form a point for the inside of the rose.
Now repeat the process cutting out a petal and shaping with the ball tool on the foam pad. A small dab of water at the base of the petal before sticking into pace. The second petal should go on the opposite side of the first.
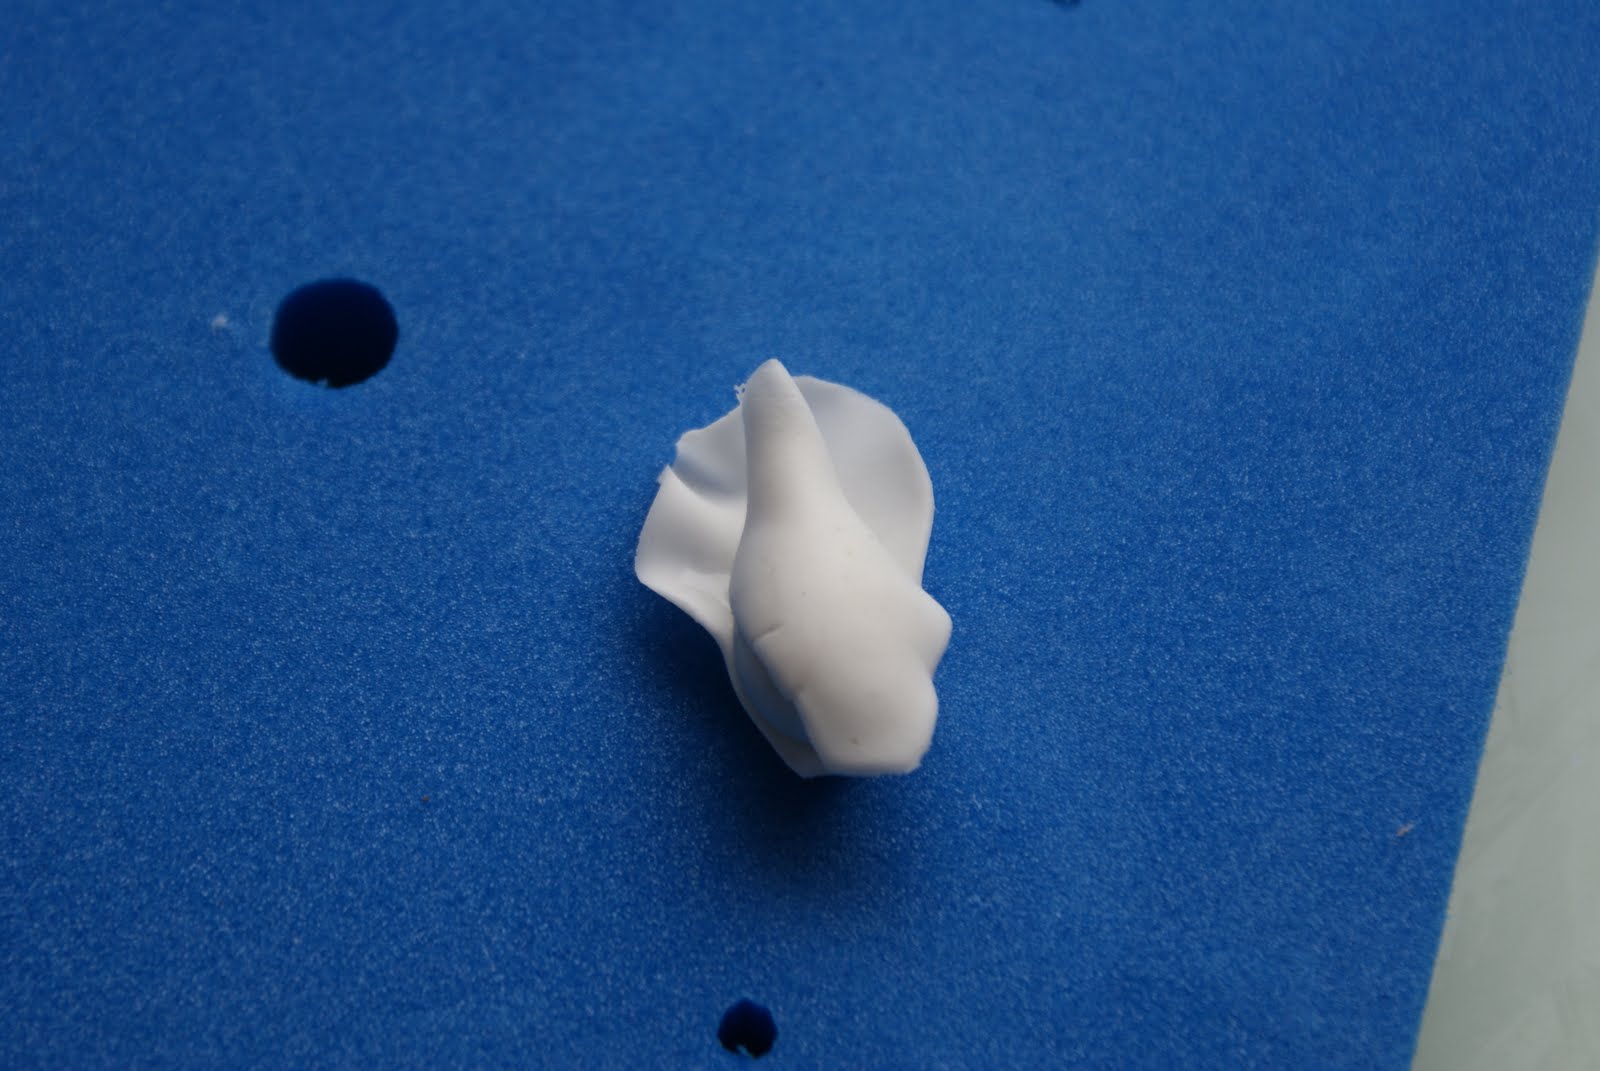
Encourage the edge of the petal to curl outwards. Don’t worry about the base of the rose being messy for now, the larger petals will cover it over. If they don’t you can easily pinch of the excess at the base and smooth it with your fingers.
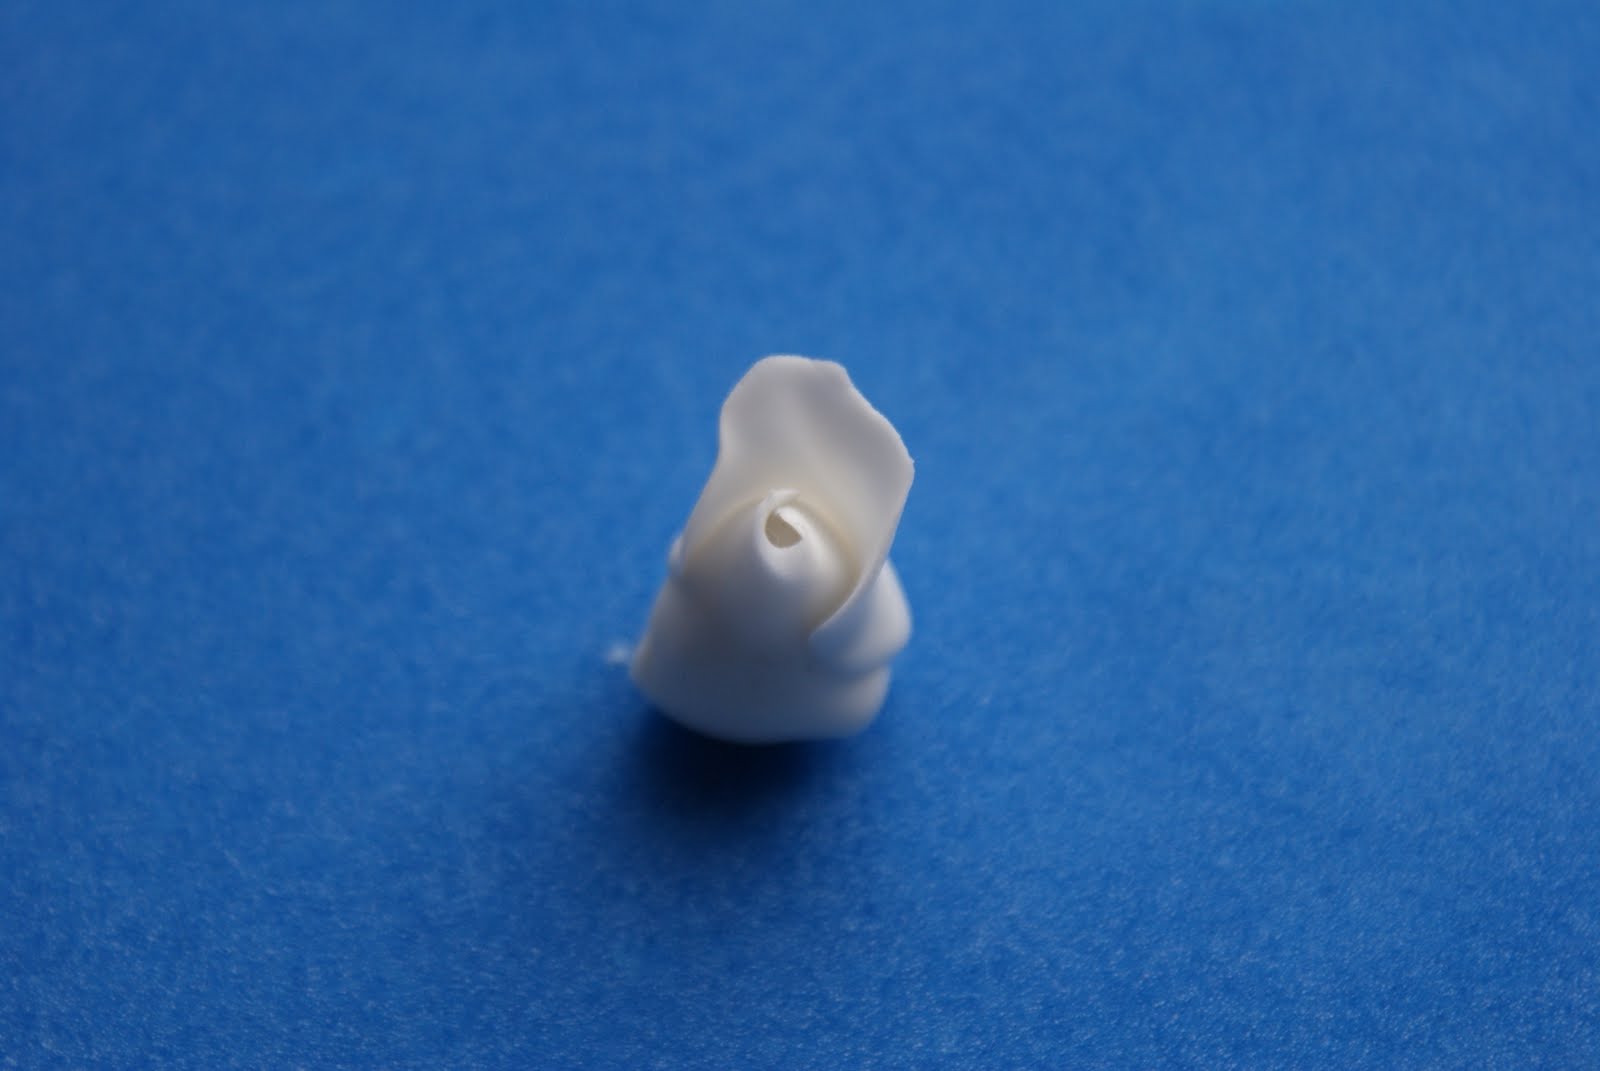
Add another petal, again opposite the last one.
Repeat, adding petals overlapping them as they go around the rose until you reach the desired look. Remember to encourage the petals outwards otherwise the rose will appear too tight.
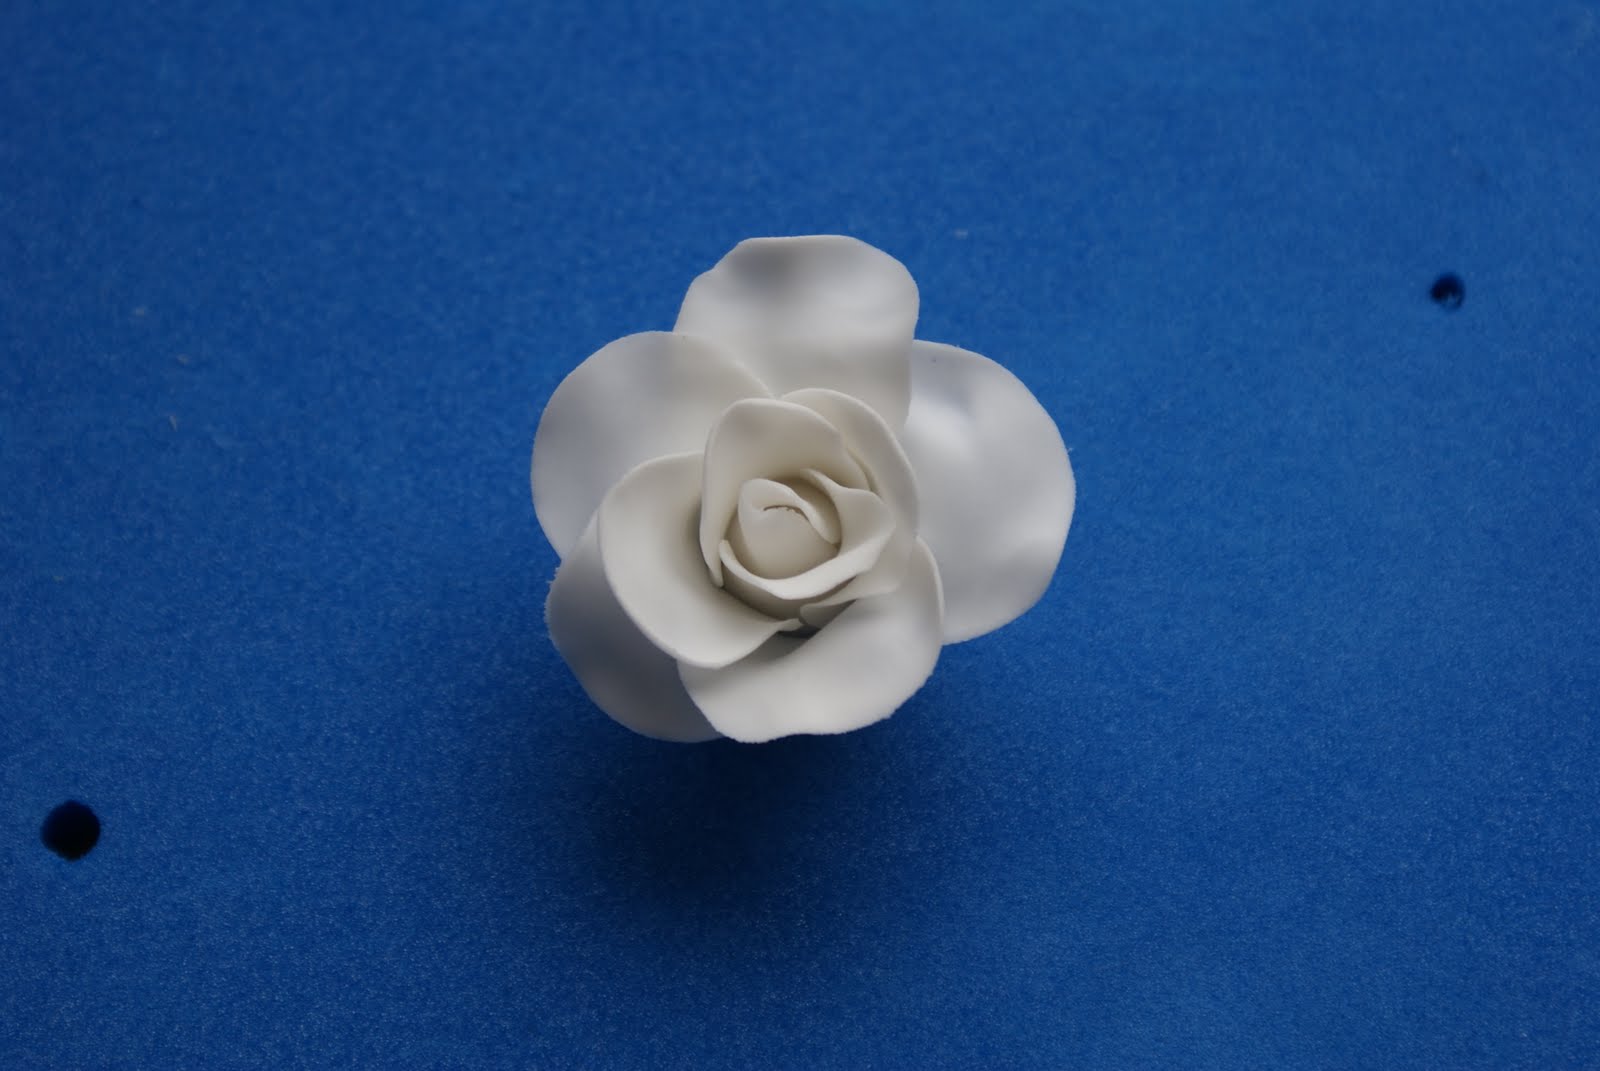
The average number of petals per rose is 10-12 but you can do more if you prefer!If you want to create a bud stop after the first three or four petals.
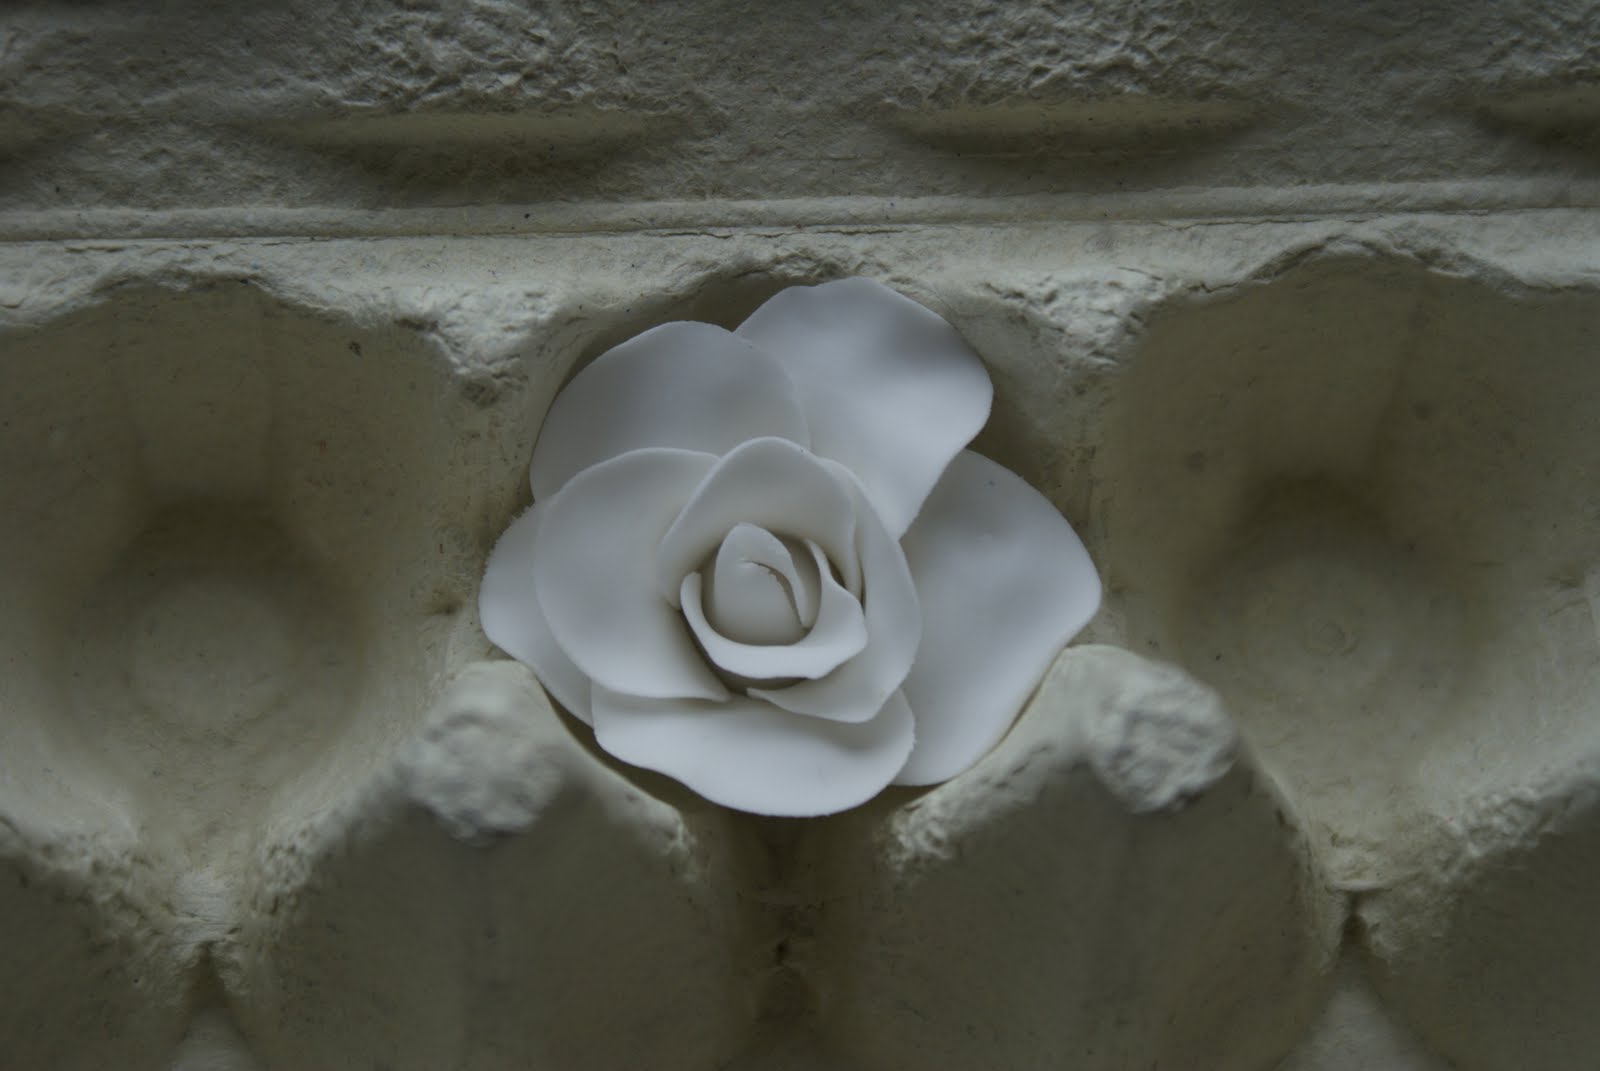
Now place the rose in a recess in the empty egg box and let it dry. This will take a couple of hours.
Roses can of course be made in any colour you like but I like white roses with a blush of colour. To add in the blush tinge add a tiny amount of blossom tint powder in your chosen colour to a small bowl.
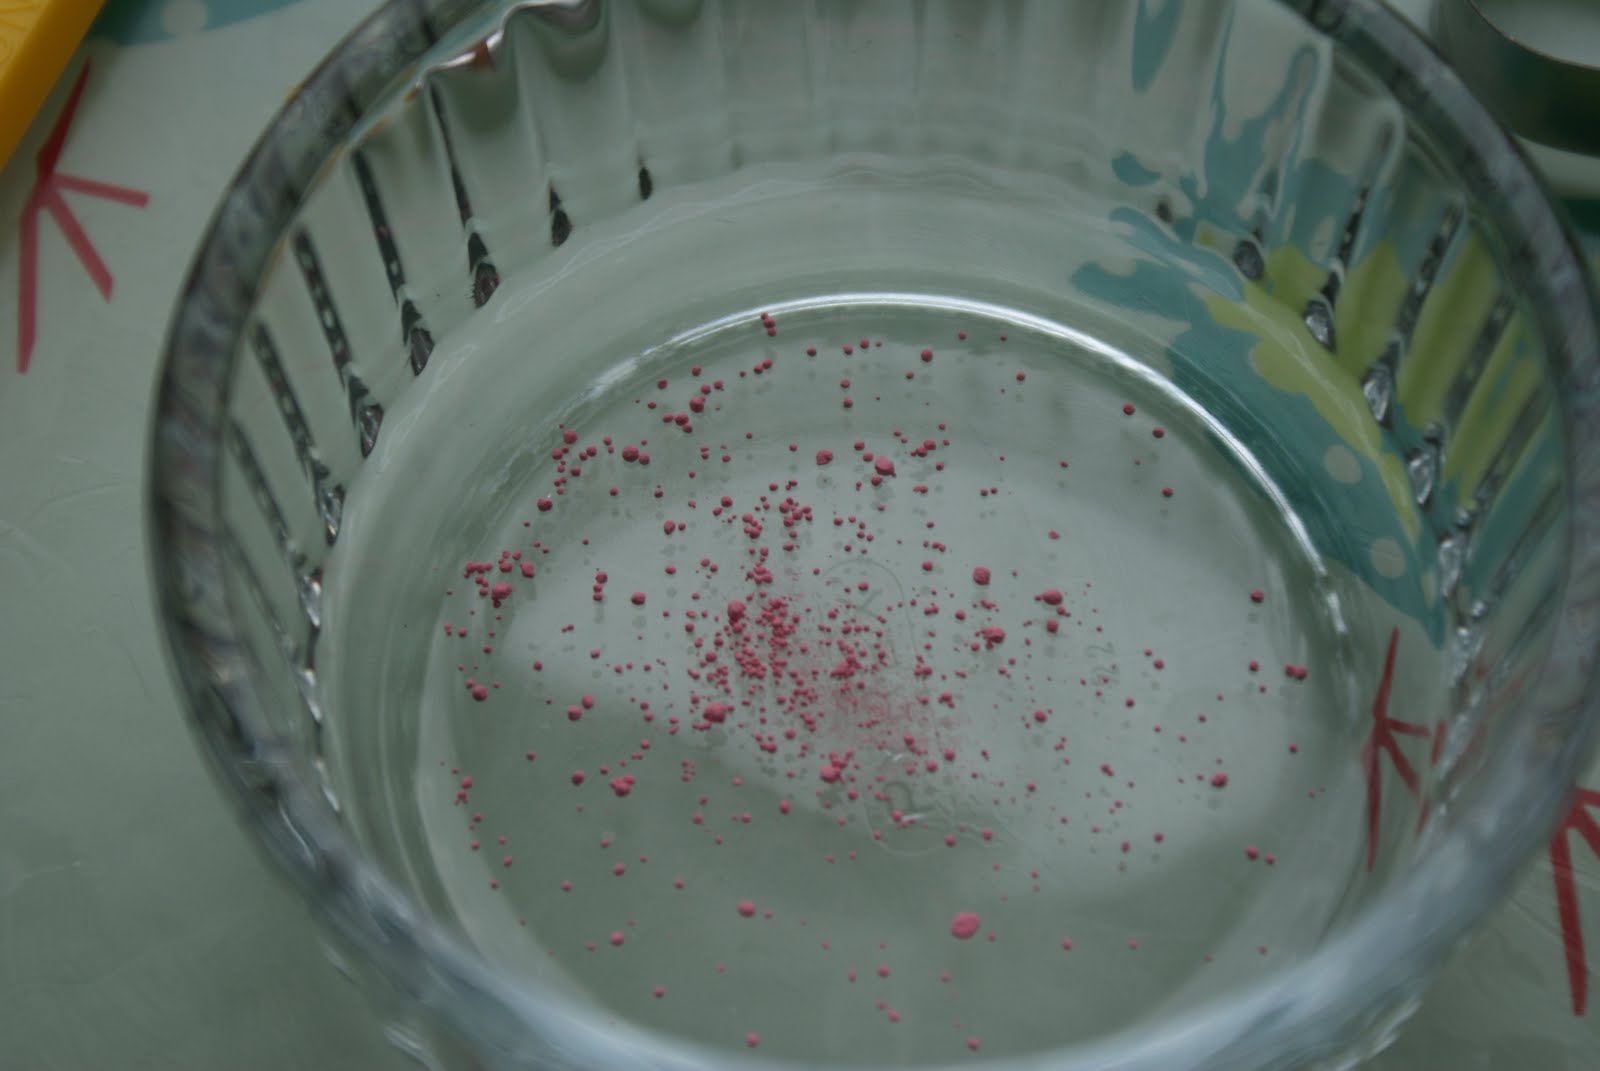
Use a large dusting brush. I use powder brushes, new and clean obviously and not taken straight from my make up bag!
Swirl the brush in the blossom dust and rub gently over the now dry rose. The edges of the petals pick up the colour beautifully and you can build the colour up to the intensity you prefer.
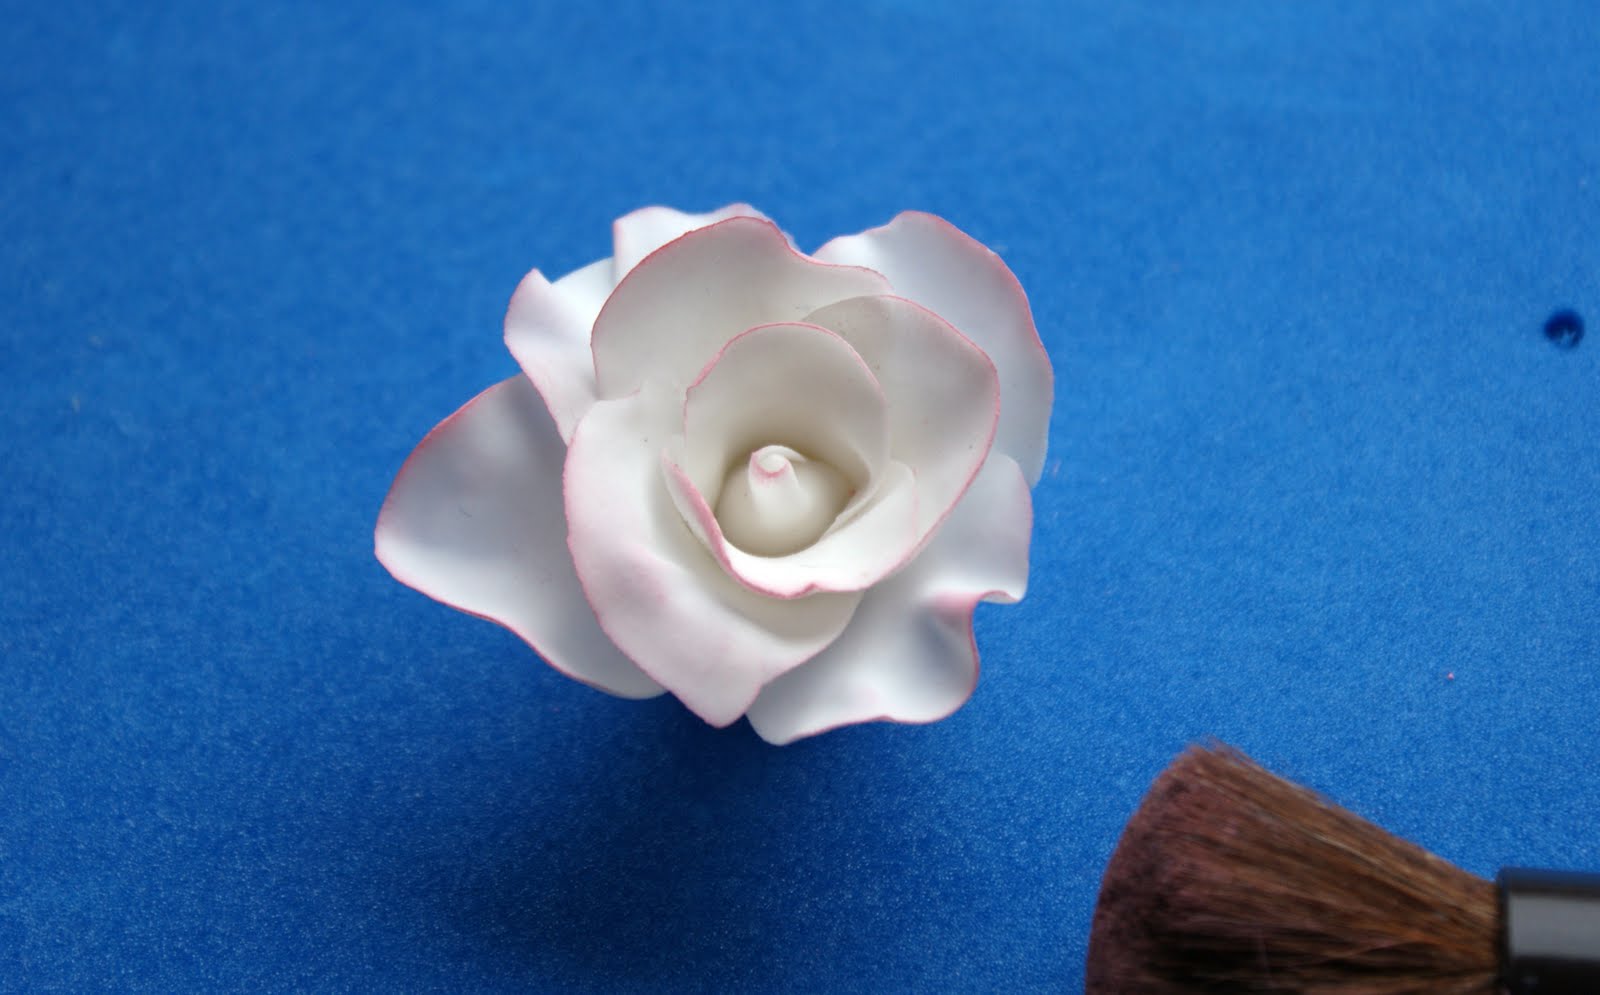
Blush Sugar Roses
Ruth Clemens, Baker Extraordinaire
Finalist on BBC2 The Great British Bake Off

I only just connected 2&2 together! I watched the Great British Wedding Cake & loved these roses! I didn't realise this was your blog!
I'd love to give these a go one day!
A great tutorial! Thankyou.
Very clear steps and explanations.
thanks for sharing this – must get some SFP and give it a go!
Love this! Thanks so much. I have all the tools but have just never got around to using them, but will now!
Beautiful! Thank you for the turorial, I will definitely have a go!
Morwenna
god you're so talented… I would lose patience after the first petal… lovely tutorial x
How much practise does it take to be able to make a rose look like a rose! It looks ok to do but I can imagine that actually putting them together is tricky. Lovely tutorial, would love to give this a go.
Lovely blog.
You make it look so easy!! I'd love to learn how to make sugar flowers, after seeing this I am more tempted to 'have a go'!!
Hmm, mine have never turned out like that – lack of patience I expect!
Just amazing!
These are really beautiful Ruth. What an excellent step by step guide too.
Although I like decorating cakes I had never made sugar roses – only the cartoon stylised type of ones before. I made these for The Great British Wedding Cake project for which we had five days to come up with recipes and a design so I can assure you I haven't been practising for years – more like a couple of hours if I was lucky!
WOAH! I was shocked because from the first picture I thought you were showing actual *real* flowers and I was all "ok, I already know how to "sugar" roses by dipping them in sugar, no thanks" but then I realized you actually MADE them OUT OF sugar?! Holy tamale, you are one talented decorator! Those are some of the prettiest sugar roses I've ever seen. So delicate and the color is just right…thanks for sharing!
I have just had a go and am so pleased with my first one. Thanks for the fabulous instructions – so clear and easy to follow! xxx
Golly I'm not sure if I could do it, even with your clear instructions – you make it look so easy! I love how you 'blush' them with the colour, it is so realistic. Beautiful!
Jones x
Wow, these are fabulous! I'm making a cake for my cousin's birthday next week and while I'm not sure I'm brave enough to try the sugar version, would the same technique (in terms of moulding leaves etc) apply to roses made with modelling chocolate? I think that might be a little easier for my first attempt!
Hi thelittleloaf! Modelling chocolate is a little different to work with as its much more pliable for longer. Instead of this method I would start with a cone as per these instructions and then for shaping petals roll small balls of modelling chocolate, put them inside a plastic sandwich bag or plastic file pocket and then press them flat into a petal shape between the plastic with your fingertip. Thin the edge of the petal with your finger whilst still in the bag/plastic and then remove and use to form the rose. You can shape 4 or 5 petals in the bag at the same time and then use them to build the rose. x
Thanks so much for such a detailed explanation – this is fab! I'm having a go at making them on thurs so will let you know if I'm successful 🙂
these look sooooo good
How did you attach the roses to the cake?
Tea & Thee – the easiest way to do it is to pipe a dot of royal icing to secure the roses in place, if not mix a small blob of sugarpaste with a little water to make a paste and use a dot of that x
Such a beautiful tutorial, I will need to pluck up courage……..me thinks. 🙂
Your step by step guide is really usefull. Im only 16 and I have always wanted to have my own business in cakes. With you little tips this will really help me. 🙂 xox
Just had a go at making these sugar roses, they turned out great!
Such an easy tutorial to follow, thank you.
Brilliant! xx
Ruth thank you so much for sharing. You are an inspiration to those of use who like having a go.x
Hi! I just came across your page tonight! I really love it, thank you so much for sharing. I’m going to try these roses! You do such a wonderful job! I am in the States and have never heard of or seen “Trex”. Can you suggest somewhere I might have luck finding it or something that would substitute if I can’t locate it here! Thank you so much! Lou
Trex is a white vegetable fat, the veg equivalent to Lard – I think the US equivalent is Crisco? x
at first i thought maybe the flowers recipe shown are simple but when i saw all the proses to make 1 flower i was shocked.
does this work as well with fondant. Also where can I buy the cutters for the petals. Thanks.
Its a bit trickier with fondant as its more sticky and takes longer to dry but the principle is exactly the same. The cutters for the petals you can get hold of from most cake decoration stores, and they’re on Amazon too if you search rose petal cutters xx
I have been using your website for a while now every recipe has been great chocolate muffins disappear so quickly brought another muffin tray to do 24 at a time make them for everybody excellent website!!!
Great news! Trouble is, even though there’s more they’ll still be gone as fast 😉 x
Pingback: Red Velvet Cake with Sugarpaste Roses | 100 Days Of Evelyn
Ruth I came across your blog last night. I am making my brothers wedding cake and enjoy baking however I wasn’t having much success with my roses until I followed yourblog. I did have to change things slightly as I don’t have a petal cutter but I used the tip you said about using moulding choc and they have turned out beautiful thank you so much
Brilliant! xx
Hiya, I have been using your tutorial to make sugar roses and so far they are turning out well. I was just wondering if you have any advice about how to attach the roses to the top of a cake (they seem so fragile it’s scary just to touch them!). Thanks very much.
I tend to secure mine with a thick royal icing on the very base of the rose – that helps to hold them in position safely x
I love this website/blog so much. It has helped me more that you know. Always helpful and super easy to understand. Thank you http://www.thereadingcakecompany.co.uk
Thank for sharing freely.I really learn d gimmick behind a piece cutter.
Pingback: How to make chocolate roses | thelittleloaf
Pingback: Homemade Naked Wedding Cake | The Goody Blog