 " width="477" height="261" border="0">

This is a really simple surprise to rustle up for a birthday cake – I made this one for Dylan’s (one of my boys) birthday recently. Having seen, and tasted, a great deal of things the boys are now quite difficult to amaze. So, I made this cake in secret – think of me as you read the instructions – trying to hide cake mix, cooked cakes and decorate the blooming thing without anyone seeing! And yes it was definitely worth it to see the look on his face x
Ingredients:
Cake
500g butter, softened
500g caster sugar
10 eggs, large
500g self raising flour
Gel colour pastes (Available from Lakeland and Amazon, these are heat stable and very intense so a little goes a long way, a set is definitely a good investment.)
Filling
70g butter, softened
200g cream cheese
400g icing sugar, sifted
Preheat the oven to 160c fan/180c/Gas Mark 4.
Gather together your tins for baking. I was making this cake into Dylan’s favourite book so I wanted rectangular cakes. I used a baking tray and a roasting tin the same size.
 Using baking paper I folded a pleat in the middle of a large sheet used it to line each tin. That way I could bake four at a time. The quantities will work in round tins approx 7-8″ but if you don’t have enough then you will need to bake in stages cleaning and re-lining the tins in between.

So the tins are ready, time to make the cake.

Cream together the butter and sugar until light and fluffy.

Add the eggs gradually one at a time, adding a spoonful of the flour with each. Make sure they are mixed in well before adding the next.

Once all the eggs are incorporated fold in the remaining flour and mix until smooth.

Try not to beat it at this stage otherwise large air bubbles are formed which create pockets in the finished cake.
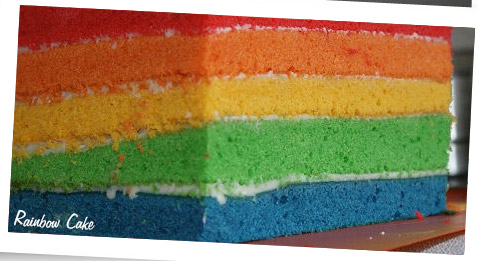
Take five bowls, recite Richard Of York Gave Battle In Vain….

what a raggle taggle bunch of bowls!
I’m not adding the indigo or violet of the rainbow but feel free to go to six layers if you prefer!
Divide the cake mixture between the bowls.

Take a little of the red gel paste colour, recite Richard Of York Gave Battle In Vain…. and mix well into the first bowl of cake mix,

Continue colouring the bowls the correct colours.

Now back to the first bowl, Richard Of York Gave Battle In Vain…, beat it well again and add it to the first cake tin. Spread it over the base. The layer is fairly thin so take your time.
Continue until all the mixture is in the tins, ‘Richard Of York Gave Battle In Vain’….


Bake them in the oven for 18-20 minutes until cooked and springy to the touch.

Cool in the tins for five minutes before lifting out carefully onto a wire cooling rack. If you’re doing double cakes like I’ve done then sliding them out from one end works best.
Allow to cool completely. (Whilst making sure no-one sees them, even though they can smell cake deny all knowledge!)
Now to prepare the filling. Dylan had requested a ‘Diary of a Wimpy Kid’ book for his birthday cake so I’m covering it in sugarpaste but would be just as lovely completely covered with frosting if you prefer, in which case you will need to make a double quantity.
Beat the butter until super soft.
Add the cream cheese and mix until combined.
Now beat in the icing sugar. If your frosting is quite runny chill it in the fridge before going any further.

Take the first cake for the base (Richard Of York Gave Battle In Vain…. but backwards). My sheet cakes are fairly level and I will be cutting it into shape but if your cakes are round and have a dome on level them off with a serrated bread knife.
I use a flexi-type chopping mat for decorating cakes on and then transfer to a board later, if you’re just frosting then place it on the plate that you’re serving it on.
Spread with a thin layer of frosting and the stack the next layer on top (Richard Of York…you get the idea, but you might as well join me with what runs through my head when I’m doing it!)

Another layer of frosting – not too much between the layers or they will start to slide around and be unstable.
Continue until you have all the cakes stacked together.

Before doing any trimming, chill the cake in the fridge for a couple of hours. This helps when you come to cut it, the crumbs don’t rip and you will get a nice clean cut.
Trim the chilled cake into shape, using a bread knife.


Apply a thin layer of frosting to the top of the cake.

Now turn your attention to the sides working on one at a time. Use a palette knife to spread the frosting over the side. You are looking for a scant layer, putting it on and almost scraping it off until the whole side is covered right down to the base. Work carefully as you get towards the corners. It’s a bit like plastering (well I imagine it is, I’ve never done it). Work your way around the cake covering each side.

Turn your attention back to the top and smooth in the edges.

Place the cake back in the fridge to chill until the frosting is firm to the touch (a couple of hours).
Once chilled, the cake is ready to be decorated with sugarpaste or given a good thick second layer of frosting.
The finished birthday cake…? Here we go – Diary of a Wimpy Kid for Dylan, 9.


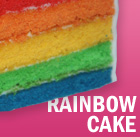
How to make a Rainbow Cake

Ruth Clemens, Baker Extraordinaire


Pingback: Rainbow coloured birthday cake | Who Ate My Crayons
Pingback: Rainbow Cake! « Through The Looking Glass
Pingback: Rainbow-Midnight-Cake | Fortune Ruby Official Blog
Pingback: Rainbow Cake | Queen of Everything
Pingback: Good Food Rainbow Cake | We Get Healthy